Topic: Remodeling
Published: 20 Nov 2026
Moving a bathroom in a Houston slab house: what cutting the slab for new plumbing really involves
Moving a toilet, tub or shower in a slab-on-grade Houston house means cutting a trench through the concrete, and the costly mistake is cutting before anyone has scanned for post-tension cables. Here is the order of work, the 4 places it goes wrong and the options that avoid the saw.
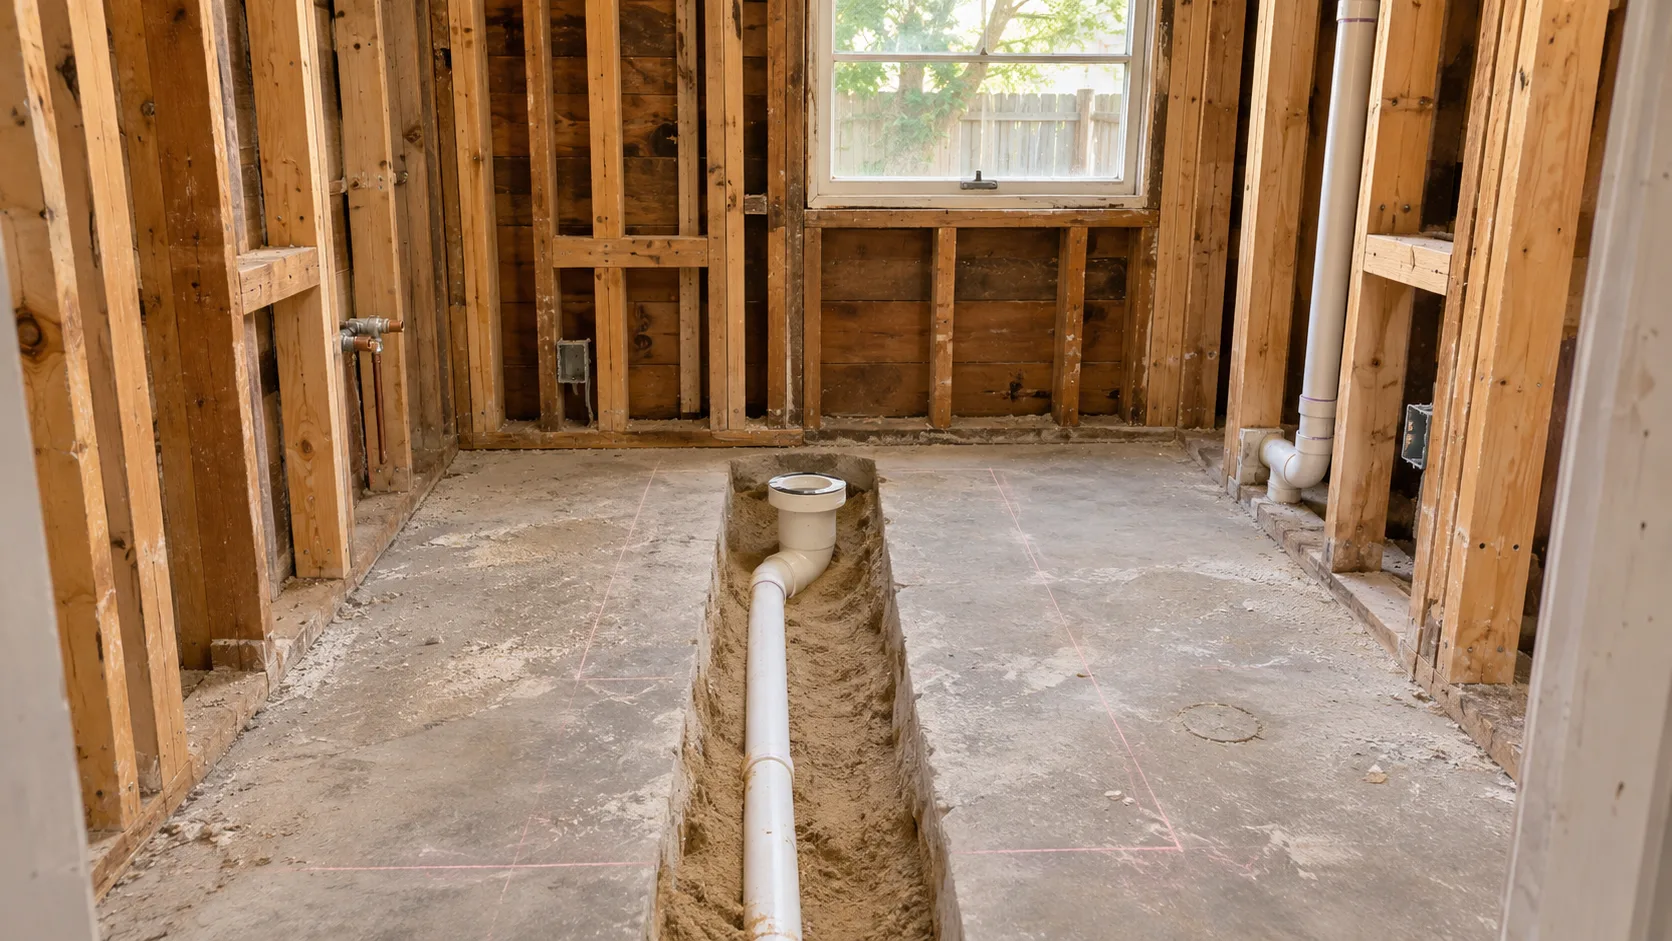
Moving a toilet, tub or shower to a new spot in a slab-on-grade Houston house means opening the concrete floor to reroute the drain, and the expensive mistake is cutting before the slab has been scanned. A post-tension slab holds steel cables stretched to tens of thousands of pounds, and a saw blade that hits one can ruin the slab, or hurt someone. Scan first, cut second, and expect the whole job to take a lot more than the single day the plumber's first estimate suggests.
Most owners find this out late. They draw a lovely new bathroom layout on paper, the plumber walks in, looks at the floor and says the word "slab." By then the cabinets are ordered.
Why is plumbing under a Houston slab such a big deal?
Because the pipes are not where you can reach them. In a house on a pier-and-beam foundation, which is common in the Heights, Woodland Heights and Norhill, the plumber crawls underneath and reroutes a drain in an afternoon. A slab house cast on gumbo clay buries the waste lines in the ground, under 4 to 6 inches of concrete, and those lines run at a slope the whole way to the sewer connection.
That slope is the part people forget. Under common plumbing codes, a drain line 2 1/2 inches or smaller needs to fall 1/4 inch per foot, and a 3 or 4 inch line needs at least 1/8 inch per foot. Move a toilet 12 feet farther from the old stack and the new line has to run 12 feet at a steady fall, which means a trench that gets deeper the farther it goes. Your layout is no longer a drawing problem. It is an excavation problem. Confirm the adopted plumbing code edition and slope table with your building department, because the number is a code matter and not a house rule.
Gumbo adds its own wrinkle. Houston clay swells when wet and shrinks when dry, and a trench through a slab is a place where soil conditions change. We will get to that.
What do you check before anyone picks up a saw?
Four things, in this order. Skipping any of them is how a 3-day job becomes a 3-week one.
- Is it a post-tension slab or a conventional reinforced slab? Houses built through the 1960s and early 1970s mostly have conventional slabs with steel bar or wire mesh. Post-tension slabs, with cables in greased sleeves pulled tight after the concrete cures, became the regional default for new houses after that. The year a house was built is only a hint. Look for the original foundation plan, which a Houston house sometimes has on file with the city or in the closing paperwork, or hire someone to find out.
- Where are the cables, the beams and the old pipes? Ground-penetrating radar or an X-ray scan of the area you plan to cut shows cable lines, rebar and pipes inside the concrete. A scan service typically takes a few hours, and it marks the safe zones on the floor with paint. Treat that paint as the boundary of the job.
- What are the existing waste lines made of, and what condition are they in? Older Houston houses often have cast iron under the slab, and cast iron cracks, corrodes and sags with age. A camera inspection through the cleanout tells you whether the line you will tie into is sound. Tie a new PVC branch into a line that is about to fail and you will be back with the saw in 2 years.
- Which permit and which licensed plumber? Plumbing work in Texas generally goes through a licensed plumber, and a city or county permit usually applies. The rules differ between the City of Houston, Bellaire, West University Place and unincorporated Harris County, and between Harris and Fort Bend. Ask the building department for the current requirement before the demolition date, not after.
How are post-tension cables different from ordinary rebar?
Ordinary rebar sits in the concrete and does nothing until the slab flexes. A post-tension cable is under load from the day it is stressed. It is a steel strand inside a plastic sleeve, anchored at the slab edge and pulled tight, so the slab is held in compression. Cut one in the wrong place and the cable can release its energy, the anchor can pop out at the edge and the slab can lose some of the strength the engineer designed into it.
The usual advice is blunt. Never cut or core into a post-tension slab without locating every cable first. Where a trench has to cross a cable line, the work goes back to the engineer of record or a structural engineer, who may decide the answer is a different route, a repair detail or a different layout. Scanning and engineering cost a fraction of what a damaged slab costs to repair. I am deliberately not quoting a price for any of this, because it varies by scan company, trench length and who has to review the details. Get written quotes.
What does the actual work look like, step by step?
A typical sequence for a bathroom move in a slab house runs like this.
First, the demolition crew removes the old fixtures, the vanity and the flooring, so the saw has a clear path. The plumber marks the new drain, vent and supply locations against the scan marks.
Second, a wet saw cuts the outline, usually 18 to 24 inches wide for a trench carrying a 3 inch drain. Wet cutting keeps silica dust down, which matters inside a house you are living in. The crew breaks out the concrete between the cut lines and hauls it away in buckets or a wheelbarrow, because a machine will not fit down a hallway.
Third, the plumber digs. This is the slow part. Hand digging through compacted clay, around a footing, at a steady slope, can run a day or two for a trench of 10 or 12 feet. The new line gets bedded in sand or approved fill, and the plumber ties into the old line or the main.
Fourth, the inspection. Under-slab plumbing generally has to be tested, with water or air, and approved by the inspector before it is covered. Do not let anyone backfill before that inspection happens. If they do, the inspector can order the work uncovered.
Fifth, the patch. The crew replaces the soil, restores any vapor barrier, sets dowels or rebar into the old slab, and pours new concrete flush with the floor. Then the patch has to cure before tile goes on it, and curing takes days, not hours.
What goes wrong most often?
Four things.
The scan gets skipped. It feels like an optional expense on a small job. It is the reason this article exists.
The backfill channels water. Sand and gravel are easy to compact and pleasant to work with. A trench backfilled with clean sand under a clay slab can act like a drain, carrying water along its length toward or away from the foundation. In a Houston neighborhood where the soil swings between dry August and wet spring, that can feed moisture to one part of the slab and not the others, and movement follows. Ask the engineer or plumber what the backfill will be and whether the trench needs a clay plug where it crosses the footing. The Houston gumbo clay foundations article covers why that movement matters so much.
The termite barrier gets broken. Many slab houses had a soil treatment applied before the concrete was poured. Cutting a trench disrupts it. Tell your pest control company before the saw comes out, and ask whether the trench needs retreating before the patch goes in. See termites and Houston houses for why that barrier matters.
The patch does not tie in. A butt joint between old and new concrete with no dowels tends to crack along the line, and the crack shows through tile. Ask the contractor how the new concrete will be connected to the old, and how the floor will be leveled so the finish flooring lies flat across the seam. Our piece on the seam between an old slab and a new addition explains the same issue at a larger scale.
Is there a way to avoid cutting the slab?
Yes, and this is where I will concede that the saw is not always the best answer. Sometimes the cheapest bathroom move is the one that does not move.
- Keep the wet wall where it is. Redesign around the existing toilet and tub drain locations. Swap the vanity and the shower, which usually only need supply lines and a short drain, and leave the toilet in place. Fixtures that sit within a few feet of the old drains often do not need a trench at all.
- Move the fixture, not the drain. A shower or vanity drain can often be shifted a few feet along a wall, then connected back to the existing stub with new pipe in the wall cavity above the slab.
- Raise the floor. Build a platform and run the new drain above the slab. You lose height, which is a problem for doors and for a curbless shower, and the step is a trip hazard. It works in a garage conversion or an addition, less well in an older bath.
- Use an upflush toilet. A macerating unit with a small-diameter discharge line can serve a toilet in a spot far from the stack, with no trench. It costs less than breaking a slab and it also needs a power connection, makes some noise and will need a service call someday. Plenty of plumbers dislike them. For a basement-style addition or a rarely used guest bath, they are a legitimate choice. For the primary bathroom you will use for 20 years, most owners are happier with a real drain.
A curbless shower in a slab house is a special case, because the shower floor has to drop below the surrounding floor to keep water in, and in a slab that usually means recessing the concrete. If you are planning one, the design side is covered in curbless shower and wet room design, and it is one more reason to decide on the layout before the plumber arrives.
How should you plan the schedule and the budget?
Add time and add a cushion. A bathroom move that looks like a 2-week remodel can run 4 to 6 weeks once you count the scan, the permit, the demolition, the trench, the inspection, the patch cure and the tile. The permit and inspection steps are the ones nobody controls, so confirm current turnaround with the building department before you promise anyone a move-in date.
For the budget, keep the plumbing line separate from the finishes. The rough-in, the trench and patch, the scan and any engineering can run into a real amount on their own, and a fixed number from a contractor who has not seen the slab is a guess. Ask for an allowance if the scan has not been done, and ask in writing what happens to the price if the cable layout forces a different route. The allowances article explains how those clauses work.
The cheapest moment to resolve all of this is before the floor plan is final. A designer who knows the slab is there will push the wet rooms toward the existing stack, and that single decision can save a trench. If a plan changes the location of a toilet, shower or tub, ask for the scan and the camera inspection first. You will be deciding with real information, and the answer sometimes turns out to be a bathroom that stays exactly where it is.